|  (SORRY, i'VE NOT GOT ROUND TO FINISHING THIS PAGE YET, PLEASE BEAR WITH ME)
 From time to time (well a lot actually) I get asked questions that I didn't think needed explaining. Most of these are to do with what functions on equipment do. So, in an attempt to lessen my email load a bit, here's a page that runs through the basic functions of a mixer and a turntable. If I can get round to it, I'll do CD systems too. When I get the chance, I'll try to pretty this page up with some visual aids. But for the moment, I just want to get this page up there. MIXERS 1) The Cross Fader The cross fader is just a means for changing the sound coming out of the mixer from what you have playing on one turntable to the other one. VERY SIMPLISTIC EXPLANATION!! On channel 1, you have tune A. On channel 2, you have tune B. With the cross fader placed to the far left, all you will hear is TUNE A, when the cross-fader is all the way to the right, all you will hear is TUNE B. Where the cross fader comes into its own is when it's in-between. This is where something called the CROSS-FADER CURVE comes into play. There are different curves which are of use for different applications. When I can be arsed, I'll do some of my impressionist art for you on this one! All it really affects is how quick one tune is cut in, how quick the other is cut out exactly. So, in summary, the cross-fader is just a means of easily changing the output of the mixer from one input to another (vinyl 1- vinyl 2 or cd1- cd2, or vinyl 1 ľ cd2 or cd1 to vinyl 2 etcůůů) 2) The Channel Faders.
These are the "up and downy" faders on your mixer. Think of these as a tap on your sink. With the fader down at 0, when the cross fader is on the side that will play that channel, you won't hear anything ľ the water is off. When the fader is up at the top, the water is on fill-power ľ and you'll drown (kidding). In my opinion, as I've said elsewhere in the site, I think it's a good idea to have your channel faders sitting at the ż's of the way up point. Why? Well, if there's too much volume when you change to that channel, you can move the fader down to adjust for it (like if you had it at full) but, if it's too quiet, and you've got the channel faders at maximum, then there's nowhere to go, so if you've left the channel fader at ż's, then you'll be able to increase it. A lot of people (including myself) use the channel faders not only as a means of controlling how loud that channel will be when you've moved the cross-fader, but also to help tidy up the mix. If you have both channel faders at their maximum points (3/4's) and you move the cross fader from left to right (or right to left) then there will be a point in the mix where both channels are playing at full power ľ together. Not only will this increase the output volume (level really) from the mixer, it'll also sound really messy because the two channels are fighting with each other. So, what I, and a lot of other people do, is mix like this:- Channel 1 is playing out live through the mixer. You've cued up channel 2, and are about to bring it into the mix. You know that when you've mixed to channel 2, you want the channel fader to be ż's of the way up. When you start the mix, you move the channel fader to about ╝ of the way up. Then you move the cross fader across a little. This really has an effect of making the cross fader curve of which I mentioned above a lot less harsh, you're bringing in channel 2 at a lot subtler a level. Then, as the cross fader gets to its centre point, you move the channel fader of channel 2 up while lowering the channel fader of channel 1. Whether you reverse their positions like a mirror is up to you, how long you spend doing this is up to you, it's all down to your own style and what sounds best, but by the norm, I'll really take the channel 2 fader to the ż's mark, and lower the fader of channel 1 to about Ż of it's level during the meat of the mix, where you want both tunes to be heard, but don't want them competing with each other. Then, once you've done the meat mix part and you want to start taking out channel one, lower the fader of channel 1 to ╝ of the way up, and move the cross fader closed. Sorted? Hope you understood all that. 3) The Gain Control.
Every input has a set signal strength coming into the mixer. For arguments sake (and coz I can't remember if they're s specific figure for vinyl) lets assume that this strength is 0dB. The important thing with gain controls though is that there is something on the mixer to measure the incoming strength of the signal. Most professional mixers DO have this, and most of the Gemini range, from the PMX-140 up I think have it to. Numark mixers have a third led string in most cases, the Gemini ones have a button to change the display of the LED from left and right to Ch1 and Ch2, the Pioneer and some Vestax ones have a dedicated LED strip next to each channel ľ the methods can all be different, but the important thing is that there is something on the mixer which will let you see how much signal strength is coming in. SO!! (got carried away there!!) Channel 1 is playing, and you do whatever you have to do to be able to see the signal strength. It's flashing away and with the gain control set to about 12 O'clock it's hitting the 0dB mark ľ grrrooovy! Then you start channel 2, and reference that. Unfortunately, in this case, the signal is falling well below 0dB. Booo!! Which is where the gain control comes in. It increases or decreases the signal that you will be mixing with ľ so you increase the gain control on channel 2 so that it's now going into 0dB too. Why do you want to do this? Well, if you position both of your channel faders to the ż's mark, and without adjusting he gain control for these two inputs, move the cross fader from left to right, you'll notice a drop in the output volume of the mixer (bad). Once you've adjusted things, you'll hopefully get to the point that the only difference is what's playing through the mixer ľ there should be little or no noticeable drop in volume. 4) Kill switches and Cuts.
A kill switch will take the desired frequency (or band) (in this case, lets say the BASS one) and once pressed, immediately take out the set amount of the frequency (mostly between 30-35dB of a kill) ľ effectively taking out all the bass in the tune. The CUT, which is mostly a rotary knob rather than an on or off switch, will gradually take out the frequency ľ so you can have anything between no cut and normally about ľ30dB of a cut on the band you've chosen. I use the rotary cuts more than the kill switches because I don't like the harshness of just CUT or NO CUT with the switches when doing most of my mixes, and if I do want an immediate 'bring in' of the bass, I just whip the rotary to its best point as fast as I can ľ which is essentially the same thing. But that's just me. 5) PAN controls
Some mixers have pan controls on each channel rather than having a BALANCE control on which effects the whole mixers output. Simply, all it does is make the output go from the left speaker when its all the way to the left, to the right speaker when all the way to the right. And, of course, when it's in the middle, it's in stereo, coming out both speakers. Why do you want this on each channel? God knows! But, sometimes, if you have one channel panned all the way tot he left, and another all the way to the right, then bring the cross fader into the middle, the effect of having one tune playing n one ear, and another in the other ear can be quite good if you've chosen the right tunes. Works really well with plain beats. 6) AUX send and return
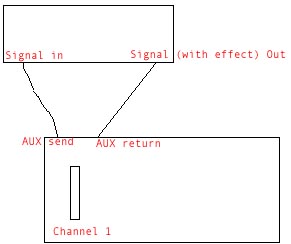
This is the control that lets you send the signal through an effects processor. It's just a loop really, before the signal it send to the output to the amp, it's looped through the effects processor to put on whatever effect you might desire:- So, the signal is send into out from the mixer, into the effects unit, you play around with it, the signal is then sent back into the mixer, which is then send to the outputs. Some mixers have these send and return things for each channel (as pictured) where some others just have a general send and return for the whole mixer output. Either way ľ they're funky things!! 7) Punch Buttons
When struck, the punch button will bring in the channel of which the button is assigned for the duration it is pressed. On many mixers, it doesn't take account of the channel fader, only the gain controls, so be careful when using it as it can sound like shit. 8) anything I've forgotten, or you'd like to know, get in touch. TURNTABLES. 1) The pitch Control.
I think most of you should know what this does, but I still get asked one question about it from time to time which I feel needs answered here ľ so I'll go through it. The pitch control adjusts the speed at which the turntable turns. So it runs faster or slower depending on where you've set it, and makes the record run faster or slower. What seems to be of confusion though is the numbering on the pitch slider. On most decks, the pitch control goes to +8% and ľ8%. The important thing here is to notice that it's a % reference for the figures. NOT a BPM calculation. A lot of people ask me that if they set the pitch slide to +1, does this mean that they are increasing the BPM by 1? The answer is in most cases no. The only time this will increase the BPM by one is if the tune they are playing is running at 100BPM. Remember, it's a % of the BPM you're changing, so if it's running at 100BPM, then +1% of it WILL increase it by 1% - which is 1BPM. If you're running a tune at 150BPM and increase it to +1%, then you'll be running at 151.5BPM. Thing is though, it's not really an accurate thing ľ especially when you're around the 1% mark. The area around the 0 pitch mark is really bizarre on a lot of decks, even Technics ľ don't know why but when you come off the click point at 0 pitch, it has trouble knowing what way you're going, so in some cases of some of the decks I've used, you lower the pitch very slightly off the 0 pitch mark, and the deck ends up running faster. The best thing to do is not mix around the 0-pitch mark. Anyway, it's just important to know that the figures are percentages of the original BPM, not BPM increases or decreases by the figure stated. It's still useful to know though. Take for instance you're running a tune at 135BPM. You know that the next one in the mix is running at 140BPM, so to get the 140 to run at 135, you'll have to put the pitch fader to around the ľ3.5% mark (I think ľ never was good at maths). So you put it to the ľ3.5% mark, then fine tune your adjustments until the two tunes match. The problem with the 0 point is finally getting solved. First with Vestax and now on the Technics MrkIII the pitch fader is completely smooth ľ there's no click point when you hit 0 pitch to throw off the grade up or down ľ pretty useful if you ask me!! 2) Pitch bend
This is a nice blend of something that is a must on CD decks. Instead of having to speed up the deck or slow it down by either touching the record, spinning the spindle, touching the side of the deck etc, there are two buttons on the turntable. One of them, when pressed makes the turntable run a little faster while held, then once released returns the decks to its set pitch. The other does the same, except slows it down. Why do you need this? Well, as much as we all love touching our records and leaving greasy finger prints all over them, some people out there think this is bad for their records!! Seriously though, it's a good point, the less you touch your tunes, the longer and nicer they'll last ľ so it's quite a good thing to have. Some of them do this job really well, but the lower spec decks are really harsh with the pitch bend, you kinda need it to be a nice smooth increase in pitch ľ where a lot of the cheap ones just leap up to a certain speed more than its already running ľ not good. As far as I can tell, the Vestax decks have it the best, and the Gemini ones are a bit too clumsy. 3) Quartz Lock
Another funky little gadget on some of the newer decks. All it does is when pressed, returns the decks pitch to 0 ľ then when released, returns it back to the pitch you've set it to. Why would you need this? God knows, if anyone uses it, tell me why ľ I've never had a deck with it on it, and can't think of the application of it to good use. Unless it's a scratching thingůů.. 4) Straight Tone-Arms
Pioneered by Vestax, these things are mainly aimed at the scratcher amongst you all. This tone arm, through its lowered counter-balance and the fact it's shorter and straight, means the needle is almost glued into the grooves. Just won't jump out. But, for the rest of us, it means less wear on the needle and the records apparently. The S-shaped tone-arms like on Technics has a variety of different forces put upon the needle as it's pulled into the centre of the record (all the forces upon the S-shaped one are a "Tracking force, an Inside Force, and a Vertical Force"), the straight tone-arm only has a Tracking force. If I could be arsed, and wasn't about to rip off the little diagram in the Sapphires catalogue, I'd draw a little thing to explain this. But I can't. I'll hunt through the Sapphires site, and the Vestax one to see if there's already something there ľ if so, I'll ask if I can link to it. 5) Anti Skate.
Anti-Skate is something that refers to the above forces upon the needle that I just mentioned. When a record on an S-shaped tone-arm runs, the needle is pulled in towards the centre of the record. (don't ask me why, I'm not a Physics kinda guy). The anti-skate counteracts this force by putting force pulling the needle out towards the outer rim of the record, cancelling the force pulling in towards the centre. Why should you want this? Well, say you're curing up a record or scratching, the needle can have a tendency to give in to the force pulling the needle to the centre of the record, and will jump out of the groove ľ by counter-acting this force, it wont. Why is this redundant? Well, in scratching, and in most parts in cueing up too ľ you're moving the record backwards as well as forwards. When you move the record forwards, the needle is pulled to the centre, when you move it backwards, the needle is the getting pulled to the outside of the record. Which means that when you have the anti-skate thing on, when you're moving the record backwards, you now have the original force pulling the needle out, AND the force that you've put on using Anti-skate. Odd huh? 6) Tone-arm height adjust and Counterweight.
The counterweight is a weight at the back of the tone-arm, which when turned in towards the needle, adds pressure onto the needle making it less likely to skip when scratching or cueing. The height adjust increase the weight already on by making the tone-arm point down at an angle, exerting even more force, making it less likely to skip. Be careful though, if you've got your tone-arm height to the top, and the counterweight on at full, you'll wear out your records and your needles REALLY fast. Tip ľ a lot of people put the counter-weight on backwards so they can wean out a little more weight from it. Try it ľ it might work. If you want to know how to set up your tone-arm, then there's a bit on my FAQ about it. 7) The strobe.
The little red light at the side of your deck (normally left corner and has the on-switch) is a strobe light. What it does is illuminate the little bumpy bits on the side of the deck to let you know the accuracy of the deck. If you have the pitch at 0, then one of the rows will be still (hopefully ľ if one of the rows is almost stopped, but still moving horizontally at 0 pitch, then there's something iffy with your decks.) That's really the only use I have for them. If there's some incredible thing you can do through them that I don't know of, please tell me. 8) The Target light.
Like your health, you don't really think about it, or miss it until your don't have it. For some strange reason, the new budget decks from Numark (1500 and 1510 I think) doesn't have the target light on it ľ which is really annoying. What it does is shine a light along the grooves of the record where the needle traces, and lets you see the grooves more clearly. Why would you want this? Well, if you take a good look at a record under good light, you'll see that there are groups of different shaded parts on the record. This signifies breakdowns (where it's blacker) and the main parts of the tune (where it's kinda grey). Having the target light lets you see these shaded areas a lot easier (especially in a dark club) so you know that there's a breakdown about to happen and you know when it's going to finish etc. Again, it's only until there isn't one on the deck, or its broken that you realise just how much you rely on it to help you through your placements in the mix. And, for now that's it. As I get more and more requests for descriptions, I'll update this page ľ but for now, this is all I can be arsed writing!!
Hehe, click it, if you're a fan of Kevin Smith stuff like me, you'll love all this
sex levis coke coca-cola
|