|
How to Record a Mix to PC
The first in the set of three "How To's" from Justin Hornsby (contact him on Justins email address (remove "nospam" from address)), a Dj who's just trying to share the know-how like me. A lot of hard work has been put into these three guides, so read and learn. The programs he mentions using are the best for the job. By all means substitute your favourites (I use Cool Edit instead of Sonic Foundry) - just don't come to us if it goes wrong!!
It's all very easy. What you need:
A PC (obviously)...
A reasonably good soundcard and speakers. You should
ideally already have a good set of speakers plugged into your PC. If
you don't, invest in some - you won't be sorry ;-)
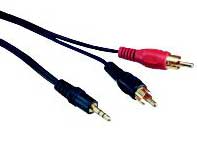
A 3.5mm stereo jack plug to phono lead
Turn your speaker
volume down to minimum. Connect the two phono plugs on the above
lead to the line output of whatever you want to record (e.g. minidisc or
mixer). Plug the 3.5mm stereo jack plug into your PC soundcard's
line
input
. The
line input
socket is normally black coloured
(the line
output
socket is usually the lime green one). Turn
up the volume of your speakers to a reasonable level. Play the sound
source which is now connected via the lead.
Now open up the
windows mixer panel by double clicking on the speaker icon in the system
tray near the clock (bottom right hand side of the screen)

Select the LINE
input and adjust its volume.
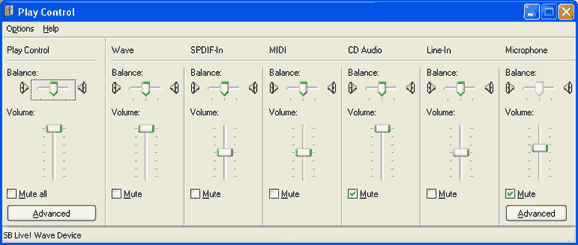
When you're happy that it sounds nice &
doesn't distort, move to the next step. If it does sound distorted,
turn down the volume of the line input in Windows mixer - and if that
doesn't help, turn the output of your mixer down - it's too loud!
Open the windows mixer panel again. This
time select Options, properties then select 'Recording'.
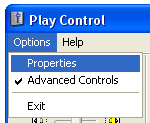
Make sure the line input is the only input
selected - this is shown by a tick in the checkbox associated with the
input fader. If you have any other inputs selected you run the risk
of recording Windows system sounds and hiss from your soundcards
microphone channel!

Now you need to open your sound recording
program.
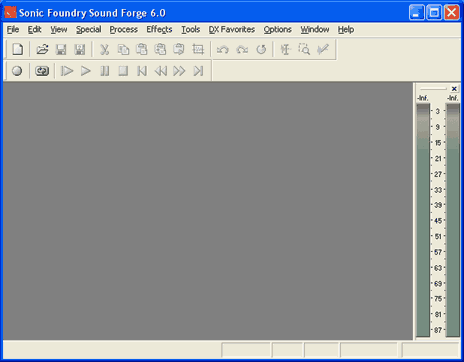
A good one will let you enter a 'record ready'
mode - usually by just clicking on the first record button. What
happens here is that the program is READY to record but it's paused.
This is useful because you can look at its level meter to make sure the
input isn't too loud. Your recording program does have a level meter
doesn't it? If it doesn't, you might as well give up now & try
again when you have a proper sound recording program!!!
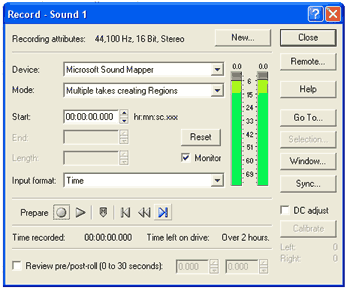
If the level meter is always in the red, first
try turning down the level of the line input in the recording mixer.
If that doesn't work try to turn the volume down at the sound source.
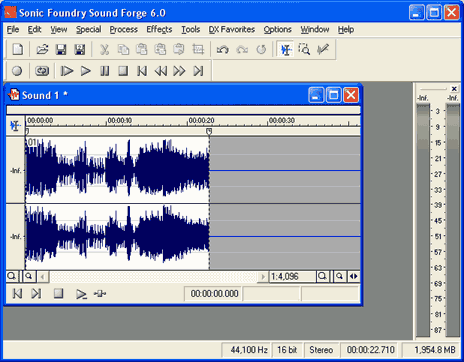
When you're happy with the recording level,
rewind whatever you want to record to the very beginning and pause it.
Click on RECORD in the sound program and play as much of the sound as you
want recorded.

When you've recorded all you want, press the
STOP button in the recording program.
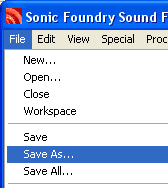
SAVE the file. Name it something easy to
remember like (and find) "stevesmix10-07-04".
So that's it! You have now successfully
recorded sound onto your PC's hard drive.
Now you might think it's ready to burn onto
CD... before you do that, just play it back to make sure it's okay.
You don't have to listen all the way through but it helps to check it at
various points in the recording just to make sure.
Okay so now you've recorded
& saved a big soundfile you're happy with... Suppose you want to
burn a gapless CD with trackmarkings. It's easy. Of course if
you want to use Nero to do it (and you've got all night to wade through
the file) you can go ahead and use that. But if you're anything like
me you want as little frustration as possible. Here's how to use
Soundforge to split the big file into tracks:
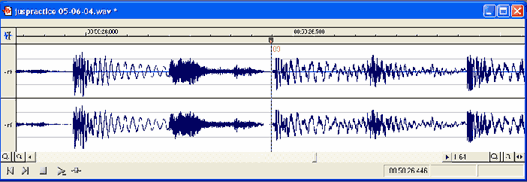
Make sure the file you want
to split is open in Soundforge. Zoom into the start of the
recording.
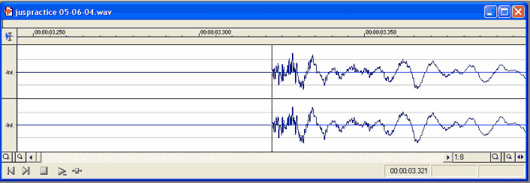
Highlight the silence before
the music starts.

Hit the scissors button to
remove it. (You can trim the end of the recording this way
too). Click on the very start of the soundfile and press
m
to
mark the start of the file. This is very important!

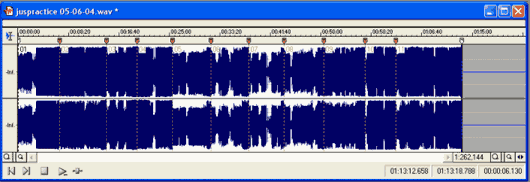
Then, go through the
soundfile, zooming in and playing parts back to find the start of new
tracks. For a mix CD it's best to put the track marks at places
where the next track obviously starts, say the first beat of the upcoming
track which doesn't have any of the outgoing one mixed in. Press
m
where you want the track mark to be.
Repeat the process until
you've marked all of the tracks you want to separate.
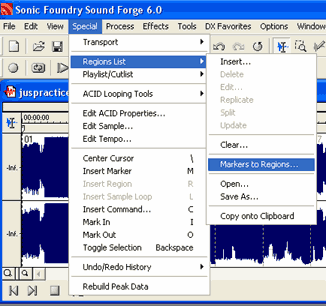
Go to the
special
toolbar on the top menu. Select
regions list
and then select
markers
to regions
. This will convert all the markers you put in to
regions which will later be split into individual wave files.
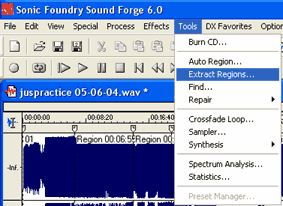
Once you've done that, go to
the
tools
menu and select the
extract regions
option.
This allows you to strip all of the regions now set, into separate wave
files. One thing to remember here is that whatever you do here the
original long file will remain untouched!
Tip: make sure
you have enough spare hard drive space for this.
When that process is complete
you can exit out of Soundforge (there's no real need to save the edited
file on closing) and open your favourite CD burning program - the one I
use is Nero.
Having opened Nero and
selected its audio CD burning tool, find all the separate wave files that
you just split from the big file and drag them into Nero. You can
easily re-arrange them if they don't appear in the right order.
Select a track and click the
play
button for each one just to make
sure.

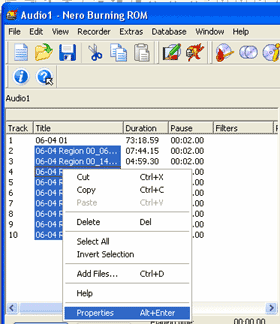
Since you want a gapless,
seamless mix CD you need to set the pause between each track to
zero. This is very easy to do. Select all tracks
except
the very first one. Right click on the selected tracks and select
properties
.
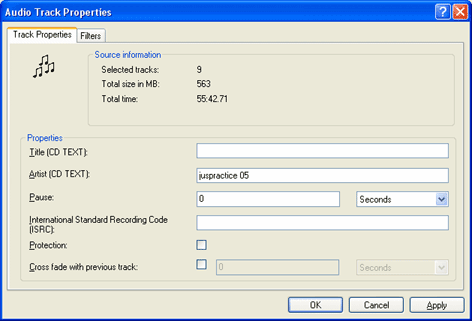
Set the time in the
pause
field to 0 and click
OK
.
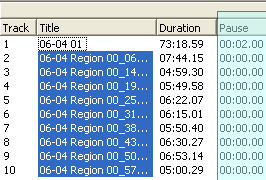
Your track listing should now
look similar to this - note the section highlighted in light blue:
Put a blank CD in your burner
and click on the burn button as if you were burning a regular CD.
That's it! All done.
Remember:
This
is only one out of hundreds of possible methods you can use to make a
seamless mix CD. There are scores of programs out there which can do
this job, but none I've used seem to be as easy to use or as painless as
Soundforge.
Another top tip - when you're
working with sound recordings on your PC try
whenever possible
to
keep an original wav file of the recording. Compression like MP3 is
great for saving space but repeated operations on mp3 files can reduce the
quality very noticeably. That is - you load a file one day, do
something to it, then save it - load it again another day, edit & save
it again - each time you de-compress and re-compress an MP3 you're losing
more & more quality. Also watch out if you save your
extracted tracks as MP3s before burning to CD because some MP3 conversion
programs put a small gap at the start or at the end of every file - this
will result in your mix CD being less than seamless. Don't say I
didn't warn you!
NOW THERE'S
NO
EXCUSE TO SPOIL LOVELY MIX CDs COZ THEY ARE ONE CONTINUOUS 80 MINUTE
TRACK! :-P
sex levis coke coca-cola
|


